Now that you've seen the studio at Sunset River, it's time to check out the wheel!
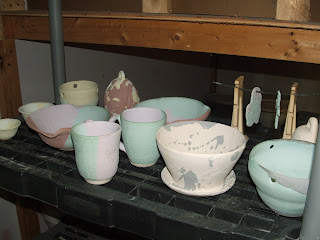
We often use the phrase "wheel thrown" in our descriptions of pottery. This is as opposed to pieces that are "hand built." There are many potters who choose only one of these methods, but we find that we can do some very interesting things with both. For instance, some of our plates are wheel thrown and others are hand built using molds.
For this post, I photographed Mom throwing a large bowl on her wheel last week while I was visiting. You will have to imagine the fact that the wheel is spinning quite fast and I'm literally capturing a split second. Each of these steps is done while the wheel is spinning at various speeds, so give us a bit of your imagination and check out what she can do with those hands!
This is the wheel set up in the garage (soon to be her own "home studio"). The foot pedal on the left controls the speed at which it spins, just like a sewing machine. And next to those tools on the table, there is always a large bucket of water.

The first step is kneading the clay to make it pliable and remove any air bubbles. She uses a variety of clays, some dark, red, white, or speckled.

Next, she makes it roughly circular and places it on a bat (the flat plate) on her wheel.

Then, using a good bit of water and a very fast spinning wheel, she uses her hands and her body weight to lean over the wheel and center the clay into the middle.


You can see how fast the wheel is spinning by the amount of water being sprayed out in this shot. It can take a few minutes to get the clay centered, but it's so important to make sure the bowl comes out round : ) And as I've found in my few attempts, it can be the most frustrating and time consuming part of the process : )
Next, she uses a thumb and two fingers to gently press down and form the center. The wheel is spinning about a medium speed or whatever she feels comfortable with.


After the center is large enough, she takes a flat edged tool to smooth the bottom and compress the clay.
Now she's ready for the first "pull." Using the sponge on top for counter pressure, she "digs in" with her thumb at the bottom of the outside edge, and gradually pulls up the clay from the bottom.
 You can see her thumb working really well in this shot.


After that first pull using the thumb, she changes her grip and uses her forefinger on the outside and middle fingers for balance on the inside. This continues to draw up clay from the bottom toward the top.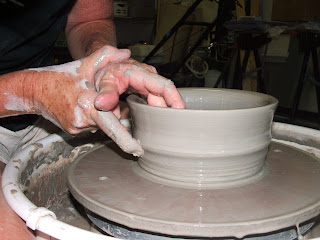

She can continue to pull the clay several times until she feels she's done enough and it's no longer thick at the bottom.
Then she uses a thin metal tool to smooth the inside and out, removing the slip (or the wet clay that can cause the bowl to sag). This smooths it and gets it ready for the next step.

That same metal tool, along with counter pressure from the sponge, allows her to continue to shape the bowl by pushing out the sides as the wheel spins.


Once it is flared out far enough, she can use the sponge to smooth out the rim and give it its final shape.
 The final step at this point is to use a thin wire and slice the bowl at the base to loosen it from the bat. You leave it resting on the bat to dry, but slicing it free at this point makes sure it comes loose later. The bat can be removed from the wheel and left to rest and she can put on another bat and start all over. The bowl is allowed to air dry slowly to be "leather hard." Usually this takes over night.
Next step will be trimming, carving, and the first firing....stay tuned.

 a similar idea shown in our


