Many thanks to Glenda from ByHand for featuring us in her Nautilus spotlight! Such lovely company we find ourselves in....
Thank you!

Thursday, July 30, 2009

Tuesday, July 28, 2009
Summer Colors: Oasis Blue
Experimenting with new glaze colors is one of the most fun and exciting parts of the design process for Mom. I even get input, too! One of our latest is Oasis. On its own, it is certainly beautiful, but we have found layering it with forest green creates the most beautiful oceanic lagoon blue color.
There are several items in the shop highlighting this beautiful summer color.
set of 3 dipping bowls
There are several items in the shop highlighting this beautiful summer color.
set of 3 dipping bowls


shell plate
(we added a little white to this one and at my request, we are doing some solid white pieces soon...can't wait to show you those!)
(we added a little white to this one and at my request, we are doing some solid white pieces soon...can't wait to show you those!)

And here is where it all began. This ruffle bowl was glazed in a progression of blues to greens....starting with oasis at the base, then forest green, then spring green. The result of combining forest green and oasis was a beautiful surprise!

one final teaser...a scroll stamped trivet in oasis on its way into the shop later this week.

Sunday, July 19, 2009
Birthday Giveaway
This past Thursday was Jeanette's birthday! In honor of the "birthday week" we are extending a brand new giveaway. In the past, we've done jewelry, coasters, bowls, and other lovely items, but this time we are offering one lucky reader a $20 gift certificate towards any item in our shop!
This one is an easy one. Just hop on over to the shop and tell us your favorite item in the shop. Leave a comment on this post and an email address or link to your blog (we have to let you know if you win after all : ) We'll pick a winner in two weeks on Sunday, August 2 , so enter now for your chance to win! (For those that haven't figured out commenting, see this post or just email us stonelotuspottery [at] gmail [dot] com).
Get additional chances to win:
1) post a link to our shop and giveaway on your blog
2) post about this giveaway on Facebook
Just leave additional comments letting us know and we'll enter your name up to three times!
Only available within the U.S. You must leave a way for us to contact you in order to win. Once notified of winning, you have one week to provide a shipping address or we'll pick another winner. Good luck!
Wednesday, July 8, 2009
Behind the Wheel: Glazing
Sorry it's been so long between posts, but it's been a busy few weeks. The last few posts showed my mom's studio and a few different ways of working with clay. Once a piece is finished on the wheel or pressed into a mold, it has to air dry for at least a few hours, if not overnight. The wet clay is allowed to dry to a leather hard state. At this point, she can choose to carve a pattern like this

She also trims the base of the piece to give it a clean edge and sharpen the lines. She centers it on the wheel (upside down) and holds it in place with a few pieces of clay. Then she can use a few different tools to trim the edges.
Once dried and trimmed, the piece is ready for the first firing. This stage of "bisque firing" is done at a lower temperature and the result is called bisque ware. This first firing removes all the moisture and gets the piece ready to take glaze.
Here is some of the bisque ware at the studio....
Next, she melts wax and dips the bottom of each piece to coat. This forms a barrier so glaze won't cover the bottom. The glaze would melt and stick to the shelf in the kiln during the next firing, so it's a good idea to keep the bottom clean!
Then it's time for the heavy artillery. She uses this compressor to spray or airbrush glaze onto each piece. There are about a thousand ways to put glaze on bisque ware, but she's quite fond of spraying. We've dipped and sponged and painted, too.
She rests the piece on a bat (kind of like a lazy susan) so she can spin it while spraying. 
And then starts spraying... 
Glaze is simply a mixture of silica, oxides, and colorants suspended in water. Because bisque ware is so porous, it practically soaks up all water from the glaze and you're left with layers of what feels like chalk on your piece. This is where I think it's safe for me to say it takes a lot of skill to glaze well. It's not like you're seeing the bright, shiny colors that will be on the final product. You have to know exactly how much is enough and what the colors will do when mixed without being able to see them during the spraying process.
Hard to believe this already has at least two coats of glaze on it....I wasn't kidding when I said bisque ware soaks up glaze like a sponge!

Heavier pieces will "stay put" while sprayed, but jewelry tends to be so light, she has to carefully hold them in place while spraying : )

You can also layer glazes on top of each other and create new combinations. Below is a picture of some rings glazed in black (on top) and black mixed with gunmetal (on bottom). The black ones are easy to see the dark color glaze in its "powdery" form, but the bottom ones with gunmetal layered over the black are a little trickier. Most glazes look more like whitewash on the porous clay, so it's all about knowing what works and learning how much glaze to layer.

Here are a few other bisque ware pieces with glaze from the studio. Here you can see some of the darker colors stand out, but most of it is just pale whitewash. I keep pointing this out because I was shocked the first time I saw this process. It's just amazing to me how much you have to do by feel and with practice.


But this gunmetal one will be in the shop soon...
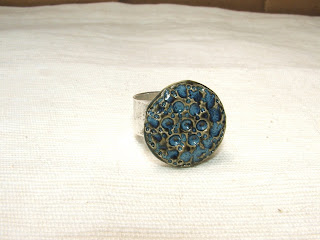
And the other gunmetal ring?!?! A certain potter may or may not be wearing her first ever piece of fashion jewelry. So proud!

Here are a few other bisque ware pieces with glaze from the studio. Here you can see some of the darker colors stand out, but most of it is just pale whitewash. I keep pointing this out because I was shocked the first time I saw this process. It's just amazing to me how much you have to do by feel and with practice.

Once glazed, the pieces are ready for the second and final firing. This time at a much higher temperature (about 2000 degrees). The glaze firing step is rewarding and challenging. Sometimes a piece comes out cloudy or the detail of the carving is obscured because you put on too much glaze. Other times it's washed out because it wasn't enough glaze. Sometimes the color combinations look muddy rather than blended. Sometimes glaze can "jump" from one piece to another if they are sitting too close together.....you get the idea. This final step is the most rewarding, but also quite challenging!
The two pieces shown as examples (the small bowl and trivet) are now finished pieces and will be in the shop soon. I will do a before and after post just to show the striking difference once I take pictures of them!
And the rings are all but gone...
The two black ones sold already...But this gunmetal one will be in the shop soon...
And the other gunmetal ring?!?! A certain potter may or may not be wearing her first ever piece of fashion jewelry. So proud!
Sunday, June 28, 2009
Behind the Wheel: Handbuilt Pottery
In our last post I briefly mentioned handbuilt pottery. This name refers to a large variety of pottery that is created by hand and not thrown on the wheel. Sometimes the clay is rolled out flat and then molded into a form or stamped with a design. Other times the clay is rolled into long thin pieces and coiled, rolled, and pieced together to make a freeform piece.
clay molded to a bowl we found at the beach house the other week : )
 a similar idea shown in our
a handbuilt bowl made by one of mom's classmates
Some of our plates are wheel thrown, but others with intricate patterns or specific designs are hand built using molds.


Our coasters and trivets are also hand built.

And of course our jewelry is hand built using carving tools, stamps and various designs.

Next up a look at glazing...
Monday, June 22, 2009
Summer Rings Have Arrived
I think I'm even more excited about this than Mom! We are introducing rings to our summer jewelry line! We have a few different styles to offer, but all of our rings are fully adjustable (easy for gift giving and easy to change hands or fingers for yourself!) The best part is they adjust at the top rather than under your finger, so no more pinching.
Here are just a few we listed, but continue to check back as we add more...
Here are just a few we listed, but continue to check back as we add more...


Saturday, June 20, 2009
Behind the Wheel: Throwing
Now that you've seen the studio at Sunset River, it's time to check out the wheel!
We often use the phrase "wheel thrown" in our descriptions of pottery. This is as opposed to pieces that are "hand built." There are many potters who choose only one of these methods, but we find that we can do some very interesting things with both. For instance, some of our plates are wheel thrown and others are hand built using molds.
For this post, I photographed Mom throwing a large bowl on her wheel last week while I was visiting. You will have to imagine the fact that the wheel is spinning quite fast and I'm literally capturing a split second. Each of these steps is done while the wheel is spinning at various speeds, so give us a bit of your imagination and check out what she can do with those hands!
This is the wheel set up in the garage (soon to be her own "home studio"). The foot pedal on the left controls the speed at which it spins, just like a sewing machine. And next to those tools on the table, there is always a large bucket of water.

The first step is kneading the clay to make it pliable and remove any air bubbles. She uses a variety of clays, some dark, red, white, or speckled.

Next, she makes it roughly circular and places it on a bat (the flat plate) on her wheel.

Then, using a good bit of water and a very fast spinning wheel, she uses her hands and her body weight to lean over the wheel and center the clay into the middle.


You can see how fast the wheel is spinning by the amount of water being sprayed out in this shot. It can take a few minutes to get the clay centered, but it's so important to make sure the bowl comes out round : ) And as I've found in my few attempts, it can be the most frustrating and time consuming part of the process : )
Next, she uses a thumb and two fingers to gently press down and form the center. The wheel is spinning about a medium speed or whatever she feels comfortable with.
After the center is large enough, she takes a flat edged tool to smooth the bottom and compress the clay.
Now she's ready for the first "pull." Using the sponge on top for counter pressure, she "digs in" with her thumb at the bottom of the outside edge, and gradually pulls up the clay from the bottom. You can see her thumb working really well in this shot.


After that first pull using the thumb, she changes her grip and uses her forefinger on the outside and middle fingers for balance on the inside. This continues to draw up clay from the bottom toward the top.

She can continue to pull the clay several times until she feels she's done enough and it's no longer thick at the bottom.
Then she uses a thin metal tool to smooth the inside and out, removing the slip (or the wet clay that can cause the bowl to sag). This smooths it and gets it ready for the next step.

That same metal tool, along with counter pressure from the sponge, allows her to continue to shape the bowl by pushing out the sides as the wheel spins.


Once it is flared out far enough, she can use the sponge to smooth out the rim and give it its final shape. The final step at this point is to use a thin wire and slice the bowl at the base to loosen it from the bat. You leave it resting on the bat to dry, but slicing it free at this point makes sure it comes loose later. The bat can be removed from the wheel and left to rest and she can put on another bat and start all over. The bowl is allowed to air dry slowly to be "leather hard." Usually this takes over night.
Next step will be trimming, carving, and the first firing....stay tuned.
Subscribe to:
Posts (Atom)